Multi-User Password Generator
Learning Objectives
- Gain experience in working with third party libraries
- Incorporate user authentication into iOS apps
- Store application data in a cloud database
- Handle user interaction for manipulating data in UITableView
Part A: Add User Authentication
Enhance your password generator app so it can be used by any authenticated users via Firebase Authentication
- Add Login screen to authenticate users using email/password.
- Add another screen to let new users register a new account
Login Screen
This screen should now be the initial view controller of your app. It should include at least the following widgets:
- A "company" logo of your choice at the top of the screen (horizontally centered)
- Two text input fields for the user to enter email and password
- Two buttons: Login and Signup
When an authenticated user logs in, your app will use manual segue to take your user to the password generator screen that you have built so far.
In response to the "Signup" button click by a new user, your app will segue to the Signup screen described below.
Signup Screen
This screen should include at least the following widgets:
Three text input fields for the user to enter email, password, and second password (for matching verification)
Two buttons: Cancel and Create Account
- Pressing the "Cancel" button will take the user back to the Login Screen
- When account creating is successful, the "Create Account" button will manually segue into the password generation screen.
This screen must verify that the email entered follows a valid email format. Search online how to use Swift Regex to verify the email format.
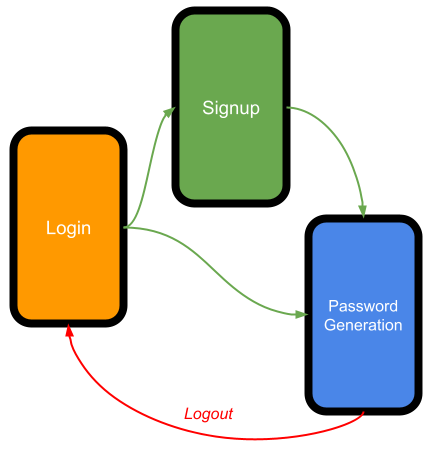
The transitions among the three screens are shown in the following diagram:

Password Generation Screen
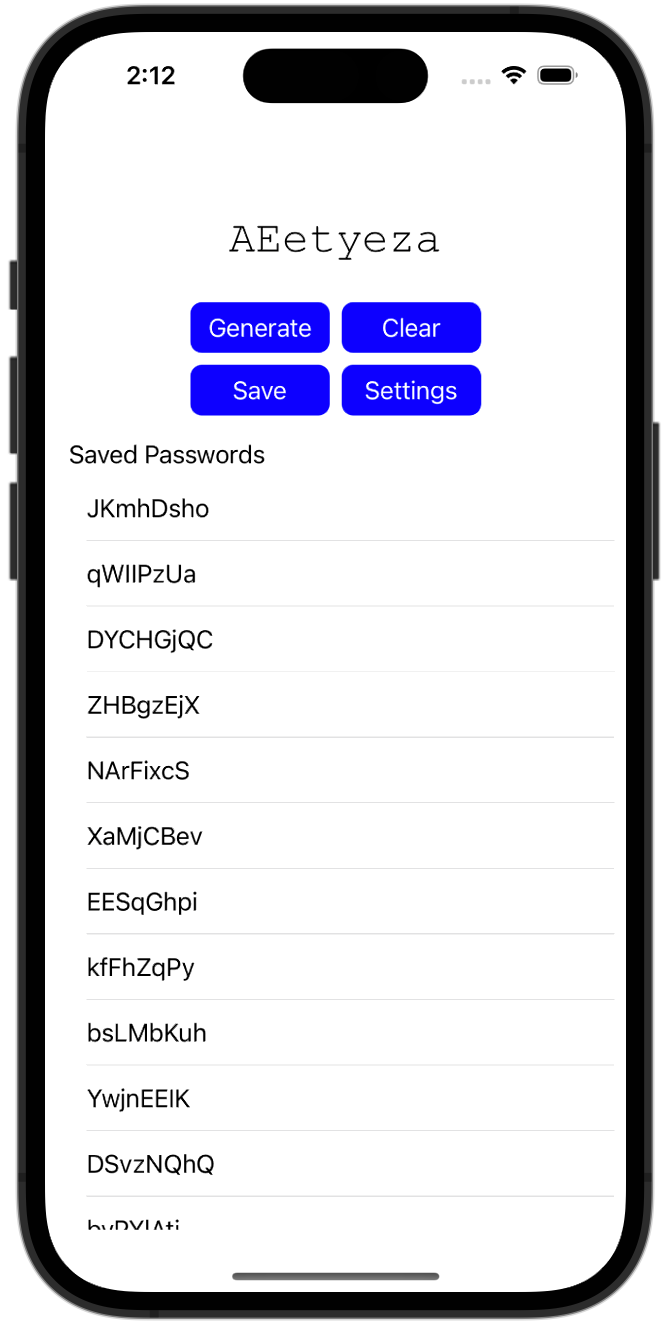
The password generation screen will mostly remain the same. The only new widgets are a button to save the current password on screen and a UITableView to show all the saved passwords.

TIP
For the landscape orientation, place the password label and the stack view of buttons on the left side of the screen and thee password table on the right side
Arrange the buttons using nested UIStackView
Add a table to show the saved passwords from the cloud database
Add a "Logout" button (in the navigation bar) to allow the user to completely logout from your app. Be sure to save any new password generated.
TIP
Use iOS unwind segue to handle the Logout behavior properly
To allow multiple users use your app, the passwords must be saved into different collections in Firestore based on the Firebase Auth userid. One password entry will be one document under this collection.
The setting parameters (password length, use special/numeric characters) should also be persisted under the user collection on Firebase. Upon login, these settings should be restored into your app.
Displaying Data on iOS UITableView
Fetching data over the network is generally expensive. To minimize the amount of network traffic, most apps will fetch the data from the cloud database once, keep a local copy in the app, and store only the changes made by the user to the cloud database. A typical setup is use an array for the local copy and use the array as the datasource for UITableView.
Unfortunately, unlike many web frameworks which automatically refresh the UI when the web data changes, iOS UITableView is NOT designed for this automatic refresh. When your array data source is updated, your app must manually inform iOS to update the table view by calling one of the following functions:
self.myTable.reloadData(): to inform iOS to refresh the entire tableself.myTable.reloadRows(at:with:): to inform iOS refresh only selected row(s).
WARNING
Use reloadDat() sparingly, only when necessary. Use relodRows() as much as possible.
Invoking one of the above functions will cause the UITableDatasource delegate functions to fire again. Any feature in your app that require visual update to your UITableView must be triggered by one of the above calls.
Part B: Enhance Table Presentation
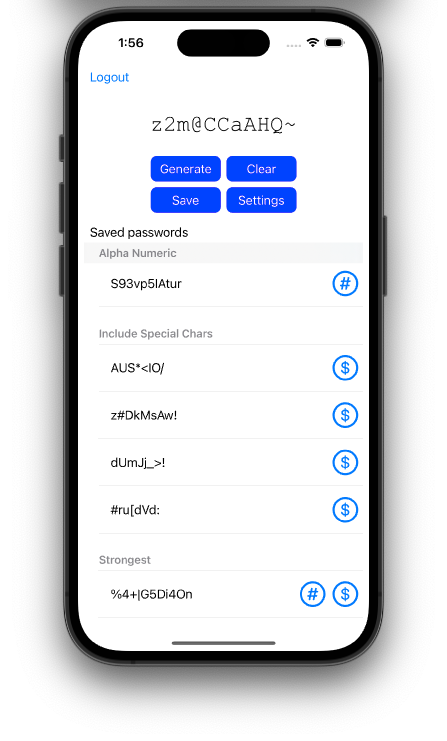
When presenting the passwords on the table, group the passwords into the following four sections:
- Passwords with alphabetical character only
- Passwords that include numeric characters (but no special characters)
- Passwords that include special characters (but not numeric characters)
- Passwords that include both numeric and special characters
Design custom cell(s) to show passwords in the last three categories above. The cell should show a unique icon for each category.

Part C: Manipulating Table Data
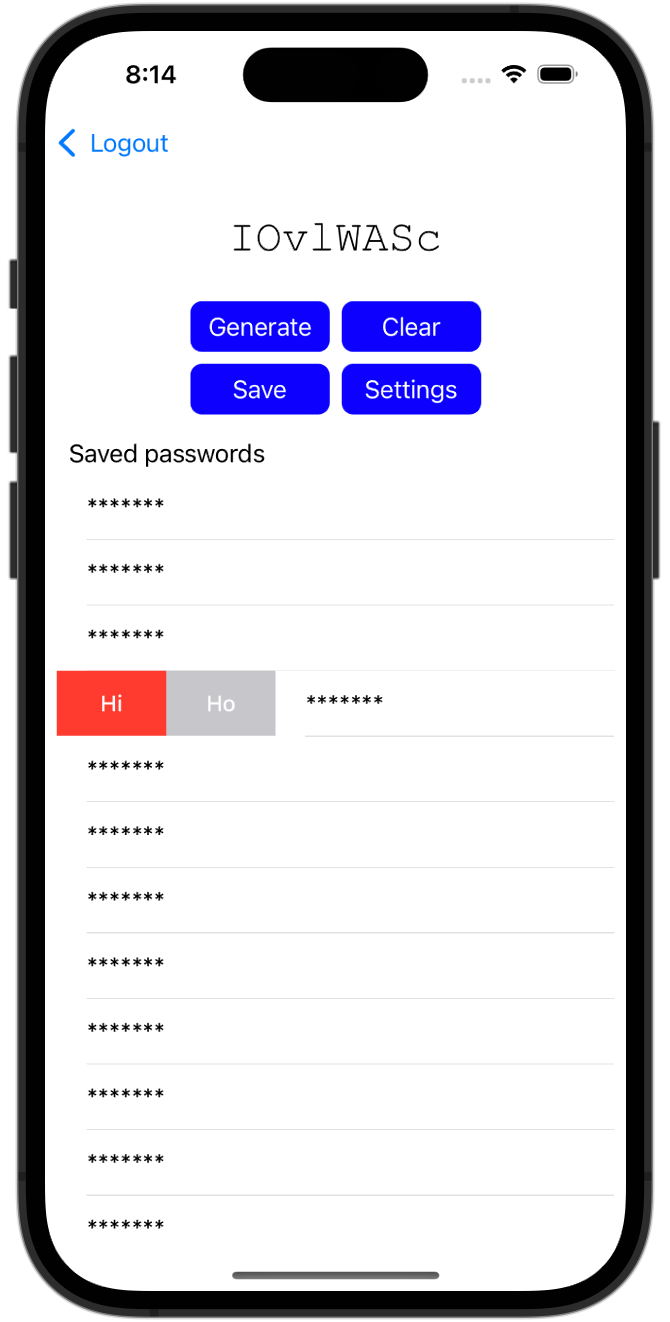
To enhance your app security, mask the password by showing only as many asterisks as the password length. Selecting a particular row will toggle the password display between the actual password or masked password. Add necessary logic to make sure that at most one password is visible. For instance, the first tap on row 7 will show the hidden password and the second tap on row 7 will mask the password again. However, if your first tap in on row 7 and your second tap is on row 11, then password on row 7 should be masked while password on row 11 should be visible
TIP
For an extra credit (5 points) use long press recognizer on the table (in place of toggle selection) to reveal the masked password
Use a swipe gesture to allow the user delete the password. This will also delete the password from the cloud database.
Implementation of these features require use of the following functions under the UITableViewDelegate protocol:
tableView(_:didSelectRowAt:)tableView(_:leadingSwipeActionsConfigurationForRowAt:) -> UISwipeActionsConfiguration?
The following snippet shows how to use the function:
func tableView(_ tableView: UITableView, leadingSwipeActionsConfigurationForRowAt indexPath: IndexPath) -> UISwipeActionsConfiguration? {
    let act1 = UIContextualAction(style: .destructive, title: "Hi") { action,view, handler in
        // Code that will execute when "Hi" is clicked
        handler(true)   // dismiss the menu
    }
    let act2 = UIContextualAction(style: .normal, title: "Ho") { action,view,handler in
        // Code that will execute when "Ho" is clicked
        handler(true)
    }
    return UISwipeActionsConfiguration(actions: [act1, act2])
}The above snippet handles a left-to-right swipe by showing two "action buttons" on the selected cell. What remain for you is to fill in the code

Grading Rubric (Tentative)
| Feature | Points |
|---|---|
| New account creation | 2 |
| Use Regex to verify email format | 2 |
| Multi-user authentication with email/password | 3 |
| Correct logout using unwind segue | 3 |
| Save/remove/reload password to/from Firestore | 4 |
| Isolated user data in Firebase collection | 2 |
Demonstrate use of both reloadData and reloadRows(at:with:) | 2 |
| Show passwords in a 4-section table | 4 |
| Save/restore password generation settings in Firestore | 2 |
| Custom cells in table view | 4 |
| Toggle password visibility (taps on same row) | 2 |
| Toggle password visibility (taps on two different rows) | 2 |
| Handling swipe action to trigger password removal | 3 |
| (Extra Credit) Use long tap to control password visibility | 5 |